Video:
Step by step:

Click Users.

Click Add.

1) For User ID, if this user will have a DID assigned use that. If it will be extension only use the following format: <Enterprise number><Group Number>_<Extension>. Ex: 0000100004_1010 (enterprise number is 00001, group number is 00004, extension is 1010).
2) For Name, enter the users name or another descriptive term for this line.
3) In the Calling Line ID Last/First Name fields, this is where the Dial-By-Name directory feature of the Auto Attendant group service will generate a matching list from. Also, the information you list here will be displayed on other on-net phone's when this user dials them. Depending on the group calling line ID name settings, this will also be displayed when other on-net users dial them.
4) This option is only available if you set the Group Calling Line ID rule to user specific. For more information click Calling Line ID Setup
5) For Initial Password, enter something unique and hard to guess. This password will only be used if the user logs into the broadsoft web portal with the User ID created in #1, or if they plan to use any 3rd party broadsoft applications that integrate with their phone. As a fraud prevention step, it is a bad idea to always use the same password for every install.
6) Mobile number is an optional field, but entering the data here for each user will produce a more robust corporate directory (Enterprise Directory). For more information click Enterprise Directory
7) Email is an optional field as well, but entering the data here will improve the directory like in #6.
8) Click OK to save changes

You will be brought back to the main users page.
1) Enter part of all of the Last Name of the user you just created.
2) Click Search

Click on the First Name of the user you created.

Click on Assign Services.

1) Under the Available Service Packs box, click the service(s) pack you wish to assign to this user.
2) Click Add to move the Service pack from Available to User.
3) Depending on what you have ordered for this enterprise, you may have some ala carte items listed in Available Services. Click the Service(s) you wish to assign to this user.
4) Click Add to move the Ala Carte Service from Available to User.
5) Click OK to save changes.

You will be returned to the users main profile page. Click Messaging on the options pane.

Click on Voice Management.
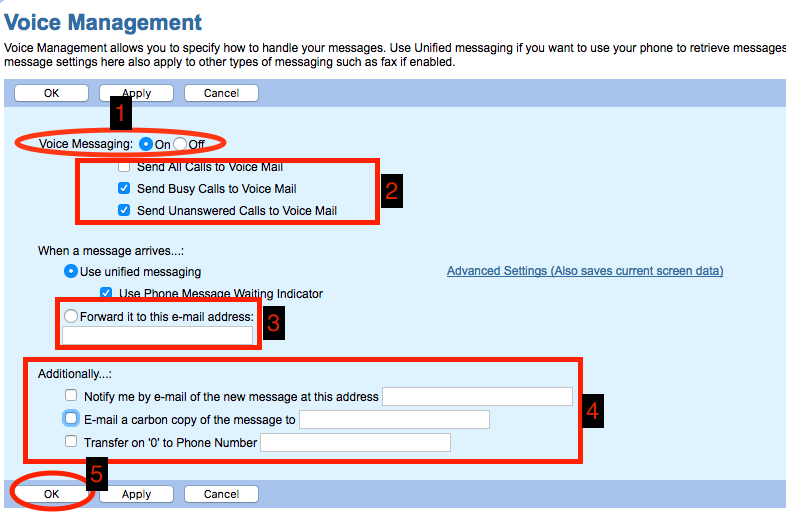
1) Click the ON button to turn Voice Messaging on for this user.
2) To send all incoming calls to voice mail, check Send All Calls to Voice Mail.
To send calls to voice mail when DND (Do Not Disturb) is activated, or if the user has Call Waiting disabled and is on a current call, check Send Busy Calls to Voice Mail.
To send calls to voice mail when they are unanswered, check Send Unanswered Calls to Voice Mail.
3) Alternatively, you can elect to have voice messages left for this user sent directly to an e-mail address by choosing this option. (Note: if this option is chosen, voice messages are never stored on our server. If the user deletes the e-mail by mistake, it's gone forever).
4) The Additionally section is optional. To have our system send an email that will notify the user that they received a voice message, choose the Notify me by e-mail box and enter an e-mail address.
The e-mail a carbon copy option is the most useful. It will send the voice message in WAV format to the email address you specify. When used in addition to #3, you will have copies left in e-mail
as well as on the voice portal. This is by far the most popular option.
If this user requires that callers can exit their voice mail box without leaving a message and be transferred to another extension or off-net DID, you will check the box Transfer on '0' to Phone Number
and enter the destination here. (Note: the user must still announce the availability of this option in their personal greeting, or the caller will not be aware of the option).
5) Click OK to save changes.

You will be returned to the users Messaging page. Click Incoming Calls on the options pane.

Click Calling Name Retrieval under Basic.

1) If you want Calling Line ID Name to pass through to the phone, select On.
2) Click OK to save changes.

You will be returned to the users Incoming Calls page. Click Profile on the options pane.

Click Passwords.

1) Click the Set portal password bubble to adjust the voice mail password for this user.
2) Enter the new password twice. (Note: it can only be numbers. Please use something unique, that is hard to guess to help prevent fraud).
3) Click OK to save changes.

You will be returned to the users Profile page. Click Addresses.

1) If this user will be assigned a DID, click the drop down menu and choose it. If extension only, skip this step.
2) Enter the extension of the user.
3) click the Identity/Device Profile button.
4) Click the drop down menu for Identity/Device Profile Name
5) Choose New Identity/Device Profile (Group).

1) For the Profile Name, use the full MAC address of the phone.
2) Click the drop down menu and select the correct make/model of the device
3) For MAC Address, enter the full MAC address of the phone again.
4) For Line/Port, use the User ID.
5) Click OK to save settings.
Note: if you assigned this user a DID, don't forget to Activate the DID. Click here for more info.
____________________

1) For the Authentication User Name, use the same thing you have for User ID without the domain portion. If this user has a DID assigned, use that. When complete, that box should match what is on top of the page.
2) Enter a unique password. This should be different for every user you build out. For security reason, it shouldn't be easy to guess. This password will never be needed by end-users, its just the way the phone will authenticate with our server. Note: if your phone device will be an Aastra phone, you can only use numbers and letters for the password. No special characters. If using Polycom or Cisco you may use special characters.
3) Click OK to save changes.
Comments